Month: May 2014

Bear Lake

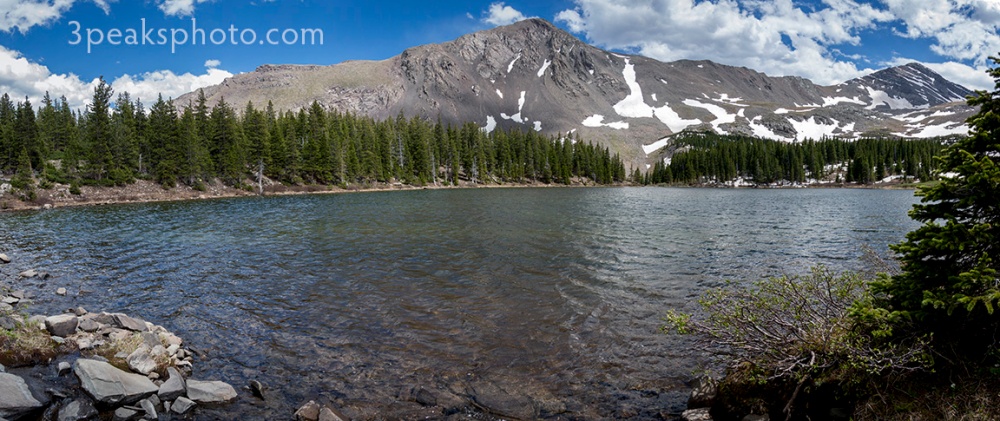
This is an almost-360-degree view of Bear Lake in the Collegiate Peaks Wilderness near Buena Vista, CO. It was made by stitching 27 horizontal images together, although 34 shots were taken. I had my camera on a monopod, and by the time I got all the way around, a cloud came over the peak on the right side, so I couldn’t use those photos. There are some issues with splotches in the sky that are mostly due to the optical distortion of the lens. This image illustrates why it’s better to shoot vertical images to construct a horizontal pano, but the results are not bad for just messing around with a monopod.

I did some basic edits in Adobe Camera Raw and removed the chromatic aberrations. I did remove spots in the sky with the Spot Removal Brush, but I discovered that those edits didn’t carry over when I merged the raw files into the panorama. The original file is almost 55 inches wide, and I surprisingly didn’t have to crop much off the top and bottom due to misalignment. I used the reposition setting in the Photomerge tool. After merging all of the layers, I added a gradient filter to darken the sky a bit with the Camera Raw filter.

The Fireballs

The Fireballs

This is a photo of the Fireballs performing on Fort Carson for the USO on June 18, 2010. They have been around for a long time and had a hit song called “Sugar Shack” in the 60’s. It was a lot of fun to photograph this show because their music is great, and they had some awesome ZZ Top-like dance moves. It was windy that day, which messed up their hair. After seeing the photos, lead guitarist George Tomsco said, “It looks like we were drinking gasoline and smoking cigars.”

To see the rest of the pictures and hear some of their songs, check out this slideshow: https://www.youtube.com/watch?v=oWS7wVh6Ah8

I made basic and noise-reduction adjustments in Adobe Camera Raw. In Photoshop, I cut out portions of the image near the edge of the state and changed the color of a duplicate, underlying layer to reduce the visibility of a safety-orange construction fence. I also used the dodge tool to reduce the shadows on their faces.

Lakes of the Clouds

Lakes of the Clouds

On my second attempt at hiking the North Taylor Creek trail on June 16, 2010, I was able to make it to the Lakes of the Clouds. This is a panoramic shot of the upper lake made from 13 vertical images taken with the camera on a monopod.

Two people told me last week that you can’t merge RAW files in Photoshop to make a panorama. WRONG! I’ve done it before, and this is further proof that you can do it, too. I synchronized the edits of all 13 files in Adobe Camera Raw, making basic adjustments and lens corrections (applying the lens profile and removing chromatic aberrations). From Bridge, with all of the files selected, I went to the Tools menu, selected Photoshop, then Photo Merge. I used the auto layout feature and chose Blend Images Together and Geometric Distortion Correction, and let ‘er rip. I added an exposure adjustment layer, then set the white balance with a curves adjustment layer. After that, I used the Camera Raw Filter and added gradient filters to the upper and lower left sections of the image to even out the exposure in the sky and reduce the exposure on the rocks. The final step was to crop.

Pikes Peak Derby Dames vs. Castle Rock ‘n’ Rollers

Pikes Peak Derby Dames vs. Castle Rock 'n' Rollers

This photo was taken during a match between the Pikes Peak Derby Dames Slamazons and the Castle Rock ‘n’ Rollers. I chose this image to be the photo of the day because the look on Lauren’s face (upper right) is priceless.

I edited this image only in Adobe Camera Raw, making basic adjustments, reducing noise and increasing sharpness.

Aspen Abstract

Aspen Abstract

This photo was taken on my first hike up North Taylor Creek in the Sangre de Cristo Mountains on June 8, 2010. It’s not unusual at that time of the year for trails in the high country to still have snow on them or for creeks to be swollen from snow melt. In this case, the water was so high in the creek, that I couldn’t get across and had to stop. It was too dangerous to try walking through the water to follow the trail. I tried bushwhacking to a higher point to see if there was another crossing, but there wasn’t . I ended up just hanging out at the creek crossing where I ate my lunch and took a nap. The first section of the trail has a lot of aspen trees, so I had fun taking pictures of them on my way back to my vehicle.

I used Adobe Camera Raw to make basic adjustments and convert to black and white (HSL), I then adjusted the curves to tone down some of the highlights and create some more contrast. In Photoshop I added an exposure adjustment layer.

Daniel

Daniel

This is Daniel. I photographed him during a charity event that I participated in to give needy families the opportunity to have senior portraits taken for free. I hope to do more of this type of work in the future.

I did basic edits in Adobe Camera Raw then used the Spot Healing Brush and Clone Stamp to remove blemishes/spots and the Dodge Tool to brighten the eyes and teeth in Photoshop.

After the Storm

After the Storm

A wicked hail storm blew threw town yesterday that knocked a lot of leaves off the trees. While driving around I thought I was in the Emerald City because the streets were covered with green leaves. Some leaves got stuck to my patio door, and this one caught my eye. The light was shining through this leaf perfectly, showing all the veins, so I set up my camera on my tripod with my macro lens and took a few shots. I like how the water formed an outline around the edge.

I first made basic adjustments to this image in Adobe Camera Raw and then increased the sharpness a bit. In Photoshop, I selected the background using the Quick Selection Tool and changed that area to black and white. I then used the clone stamp to fix some bad spots on the leaf and added an exposure adjustment layer for some extra pop.